Table of Contents

Log Siding-Renovated Home
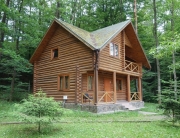
Wish you had a log home but think you can’t afford it? Now you can by converting your existing house into a rustic and charming log structure like this one. It’s not rocket science to complete the project with the help of a contractor familiar with using log siding. You can save a bundle by doing a lot of the work yourself and by using skilled friends and family.
Log homes are not only affordable, but they also provide an environment that takes us back to a simpler life. Come home from a hard day’s work or play, sit down and relax, and savor bringing part of nature inside your house. Log siding on the inside and outside provides the full log look without the full log expense. Enjoy the best of both worlds of living in the same house and owning a gorgeous log home. The high-quality building materials you need can be ordered online at competitive prices. Let’s explore how to turn any home into an affordable log home so you can get started right away.
It All Starts with a Plan
We advise all our customers to start with a detailed drawing of the renovation instead of keeping it all in their heads. A well-organized approach saves time, money, frustration and mistakes compared to making it up as you go. You will need to take these steps in planning:
- Establish a budget
- Draw up the plans
- Choose a materials supplier
- Estimate the amount of materials
- Decide who will do the work
- Obtain any building permits needed

Complete Plans Make a Complete Log Home
Renovating your current house saves the effort and expense of buying a new lot, financing the construction, and moving. You can still live in your home with minor inconvenience while the work takes place. Plan the exterior work on good weather days while the interior project can be completed under any weather conditions.
When the building materials arrive, store them in a dry environment and allow them several days to acclimate before using them. Our log siding, paneling, trims, and molding are hand-inspected for quality so you don’t have to worry about sorting out defects. They come ready to install for your complete satisfaction.
Remove Existing Exterior and Interior Wall Materials

Remove All the Existing Siding
Pine and Cedar log siding are versatile materials that fit perfectly on the existing framework. There’s no need to alter the foundation or be concerned about the structural integrity of your house. Homes that are well-suited for this type of renovation include those with these wall covering materials:
- Vinyl siding
- Aluminum siding
- Cedar shakes
- Steel siding
- Wood siding
- Interior drywall
- Old 4’x8’ sheets of paneling
If your house has a base of stone or brick a few feet above the ground, you can elect to remove them or start the siding on the top. Once the old material is removed from the walls, it’s a good time to insulate, make any repairs needed, and seal them before installing the new siding.
“Log siding on the inside and outside provides the full log look without the full log expense. Enjoy the best of both worlds of living in the same house and owning a gorgeous log home.”
Install Log Siding Inside and Out

Log Installation is Fast and Easy
You have two options for siding: install log siding inside and outside or use log siding for the outside and paneling for the inside. Our Pine and Cedar log siding is made with tongue and groove and end-matching construction for a perfect fit. There’s no need to end-butt them together on studs because they lock together anywhere on the length of walls.
Start by putting up the door and window trim followed by the bottom row of siding. Work your way up to the top by using the correct fasteners and you’re done. Trims and molding are available that match the siding perfectly.
Tongue and groove siding saves up to 20% in labor and 20% in material waste. By ordering pre-finished siding you can save even more time. These work reductions are great if you are on a tight schedule or behind on your plans.
Instructions for installing log siding are easy to follow.
Second Option: Install Log Siding Outside and Paneling Inside

Paneling Goes Up Even Faster
A popular log home option is installing log siding on the exterior and Pine or Cedar paneling on the interior. It essentially attaches to walls the same way as siding except you use a nail gun. Watch the video for simple directions on how to secure the paneling to the studs.
If you have drywall and don’t want to remove it, you can install the paneling directly on top of it. Make the necessary adjustments for positioning the wall outlets, light switches, and window openings. You must cut holes in the paneling for outlets and switches, but that’s no problem because the ends fit together tightly. Paneling also comes in a pre-finished paneling option.
Contact Us for Assistance
Our customer service representatives have many years of experience helping first-time and veteran home builders with their plans and projects. Send a message or call us today for your current and future log home needs.


Recent Comments